Fixing Warped Vinyl Siding: The Ultimate Repair and Replacement Guide
Homeowners often encounter the frustrating sight of exterior panels that no longer sit flush against the wall, creating a distorted or wavy appearance. When you first notice these imperfections, the priority shifts toward understanding the mechanics of fixing warped vinyl siding to prevent further structural damage. This phenomenon, while visually unappealing, often signals underlying issues with installation or environmental stressors that require immediate professional attention. Addressing these distortions early can save thousands of dollars in potential water damage and structural rot.
Vinyl siding is engineered to be a durable and low-maintenance solution for modern homes, yet it is not invincible. Because the material is primarily composed of polyvinyl chloride (PVC), it remains highly susceptible to thermal dynamics. Furthermore, the way these panels are fastened to the home dictates how they respond to the rising and falling temperatures of the seasons. If the material cannot move as intended, the internal stresses manifest as the unsightly warping we see on many residential facades.

In this exhaustive guide, we will analyze the technical reasons behind material distortion and provide a comprehensive roadmap for remediation. We will explore the physics of thermal expansion, the impact of modern window technology on exterior surfaces, and the precise steps required for a successful repair. By the end of this analysis, you will possess the authority needed to decide whether a simple patch or a full vinyl siding replacement is the most viable path forward for your property.
The Physics of Thermal Expansion in PVC Materials
To understand why siding warps, one must first understand the molecular behavior of thermoplastics. PVC is designed to expand and contract significantly as it absorbs and releases heat energy from the sun. In a standard twelve-foot panel, this movement can account for nearly half an inch of horizontal shift between a cold winter night and a scorching summer afternoon.
Manufacturers design the nailing slots on siding panels to accommodate this inevitable movement. However, problems arise when the material is “pinned” in place by improper fastening techniques. If a contractor drives a nail too tightly against the hem, the panel is locked into a static position. Consequently, when the sun hits the wall and the PVC tries to expand, the material has nowhere to go but outward, resulting in a permanent buckle or warp.
Moreover, the color of the siding plays a critical role in heat absorption. Darker shades, such as deep blues or charcoals, absorb a higher percentage of the solar spectrum compared to lighter tones like cream or white. This increased heat absorption leads to higher internal temperatures within the panel, exacerbating the expansion cycle and increasing the risk of thermal deformation if the installation is even slightly flawed.
The Impact of Fastener Tension and Placement
The most common cause of warped panels is not the material itself, but the human element involved in the installation process. High-quality vinyl siding is designed to “hang” from the nails rather than being nailed tightly to the sheathing. Professional installers know to leave a gap roughly the thickness of a dime between the nail head and the siding hem.
When nails are driven flush, they act as anchors that prevent the natural sliding motion required for thermal stability. This creates localized stress points. Over time, these stress points weaken the structural integrity of the panel, leading to “oil canning,” a term used to describe the wavy, distorted appearance of siding that has been compressed by its own fasteners.
In addition to tension, the placement of the nail within the slot is equally vital. Nails should always be placed in the center of the horizontal nailing slot. If a nail is placed at the far end of a slot, it immediately restricts movement in one direction. This lack of symmetry in movement potential is a primary precursor to the warping issues that plague many suburban homes today.
Environmental Stressors and External Heat Sources
While installation errors account for a large percentage of failures, environmental factors also play a significant role. In recent years, a new phenomenon has emerged involving the reflection of sunlight from high-efficiency, Low-E (low-emissivity) windows. These windows are designed to reflect infrared light away from the home to maintain interior cooling, but they can inadvertently act as parabolic mirrors.
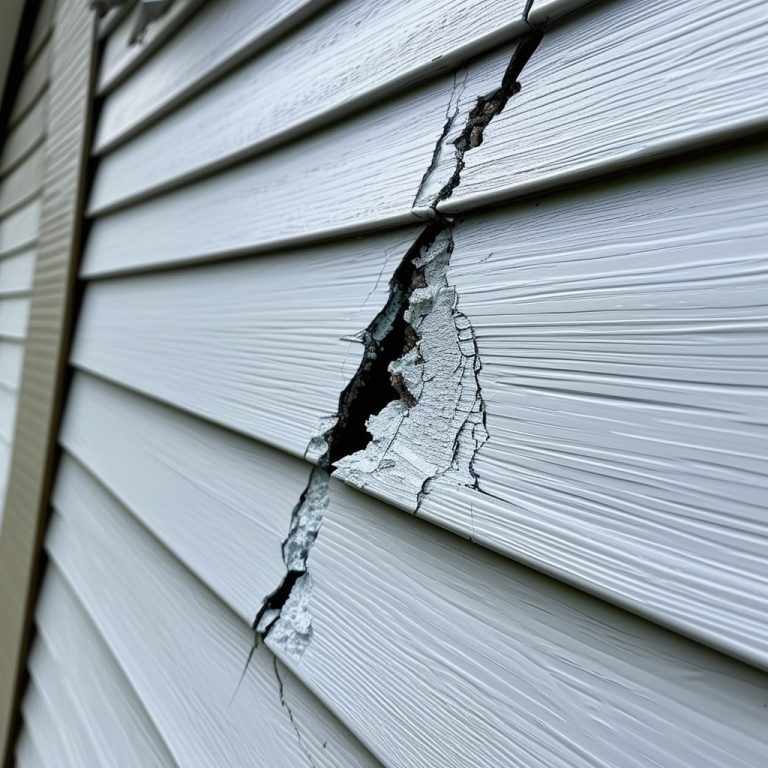
When the sun hits a Low-E window at a specific angle, the reflected beam can concentrate intense heat onto the siding of a neighboring house or an adjacent wall. This concentrated thermal energy can easily exceed the melting point of standard PVC siding, which typically begins to soften at temperatures around 160 to 165 degrees Fahrenheit. The result is a melted, charred, or severely warped section of siding that looks like it was exposed to an open flame.
Furthermore, the proximity of outdoor grills or fire pits can contribute to localized warping. Many homeowners underestimate the radiant heat generated by a propane grill. Placing a heat source within three to five feet of a vinyl-clad wall is a recipe for disaster. The heat causes the polymers to lose their shape, and once the cooling process occurs, the material hardens into a distorted, permanent wave.
Identifying “Oil Canning” and Structural Telegraphed Waves
It is important to differentiate between material warping and “telegraphing.” Telegraphing occurs when the underlying wall sheathing or stud work is uneven. If a wall is not perfectly flat, the flexible vinyl panels will follow the contours of the substrate, creating the illusion of warped siding. Fixing warped vinyl siding in this scenario requires addressing the framing rather than the PVC itself.
Oil canning, on the other hand, is characterized by a specific type of rippling that occurs along the length of the panel. This is almost always a result of the panel being too tight between two points, such as J-channels or corner posts. When the panel expands and hits these vertical obstructions, it has no choice but to bow outward in the middle, creating a series of waves that are most visible during the hottest parts of the day.
To diagnose this, a technician can often push on the siding panel. If the panel feels rigid and does not slide easily from side to side within its channels, it is likely pinned. A healthy installation should allow for at least a quarter-inch of lateral movement in either direction when pushed by hand. If it doesn’t move, the fasteners are the culprit behind the distortion.
Fixing Warped Vinyl Siding
When the damage is localized to a few panels, the process of fixing warped vinyl siding is a precise task that requires the right tools and a steady hand. The first step involves identifying every affected piece and determining if the warping is due to heat damage or mechanical restriction. If the material has melted, it must be replaced; however, if it is merely buckled due to tension, re-hanging the existing panel may be possible, provided the memory of the plastic hasn’t been permanently set.
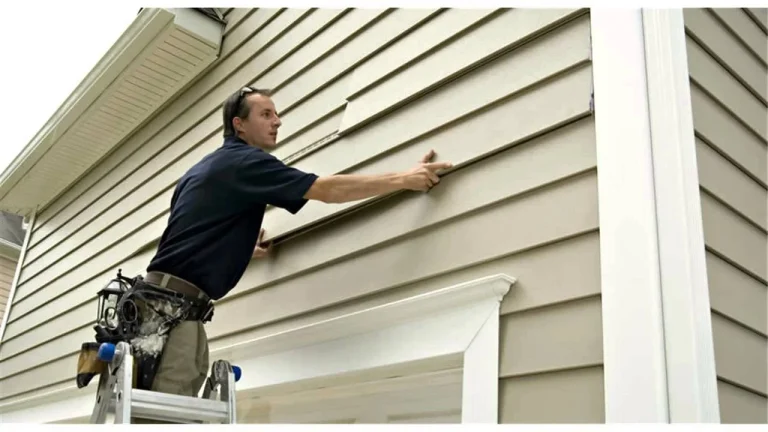
The primary tool for this job is a siding removal tool, often called a “zip tool.” This small metal device features a hooked end designed to slide under the bottom edge of a siding panel and release the locking mechanism from the piece below it. By gently sliding the zip tool along the length of the joint, you can “unzip” the siding without damaging the interlocking hems. This provides access to the nailing flange of the warped panel above.
Once the panel is unzipped, the nails must be removed. This is often the most difficult part, as the nails are hidden behind the panel above. Using a flat pry bar, you must carefully lift the overlapping panel and pry out the nails. It is critical to avoid over-bending the vinyl, especially in cold weather, as it can become brittle and crack. Once the nails are out, the warped panel can be removed and inspected for permanent deformation.
Step-by-Step Replacement Process
After removing the damaged sections, the installation of the new panels must follow strict industry standards to prevent a recurrence of the issue. Begin by measuring the opening and cutting the new vinyl panel approximately 1/2 inch shorter than the total distance between the vertical channels. This provides the necessary “room to breathe” as the seasons change.
Hook the bottom of the new panel into the locking leg of the panel below. You should feel a distinct “snap” or “click” indicating that the joint is secure. Once locked, slide the panel into the side J-channels or corner posts. Ensure there is at least a 1/4-inch gap at each end (or 3/8-inch if installing in temperatures below 40 degrees Fahrenheit).
When nailing the new piece, use 1-1/2 inch galvanized roofing nails. Place the nails in the center of the slots, spaced roughly 16 inches apart. Most importantly, do not drive the nails home. Leave that dime-sized gap between the nail head and the vinyl. After nailing the entire length, grab the panel and slide it back and forth. If it moves freely, you have successfully corrected the mechanical cause of the warping.
Advanced Diagnostics: Investigating the Substrate
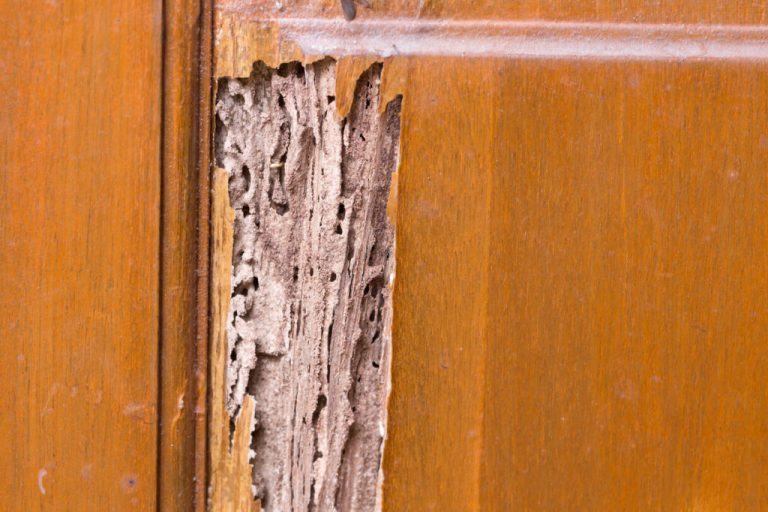
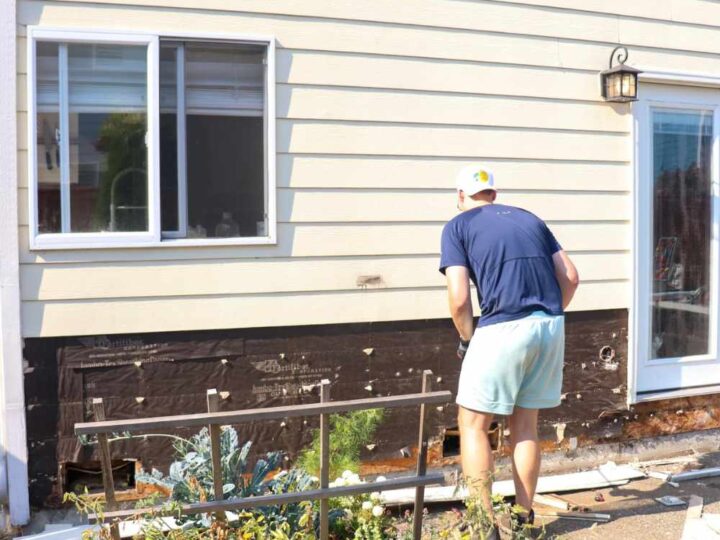
Sometimes, fixing warped vinyl siding is not about the vinyl at all, but what lies beneath it. Moisture trapped behind the siding can cause wood sheathing or oriented strand board (OSB) to swell. As the wood expands, it pushes the siding outward, creating ripples that look identical to thermal warping. This is a far more serious issue as it indicates a failure in the weather-resistive barrier (WRB).
If you remove a warped panel and find dampness, mold, or rotted wood on the house wrap or sheathing, the repair scope must expand. Simply replacing the vinyl will only hide a growing structural problem. In these instances, the house wrap must be inspected for proper shingling—ensuring that upper layers overlap lower layers—and all window and door flashings must be checked for integrity.
Furthermore, check for “buckling” in the OSB itself. If the sheets of sheathing were installed without a 1/8-inch gap between them, they will expand and push against each other when they absorb humidity. This creates a vertical or horizontal ridge in the wall that the siding will mirror. Fixing this requires cutting relief gaps in the sheathing before re-installing the siding panels.
The Role of Insulation and Sheathing in Heat Transfer
The type of insulation behind your siding can also influence how the PVC reacts to heat. Some homeowners install fanfold foam insulation or rigid foam boards under their siding to increase R-value. While this is generally beneficial, it can also create a thermal barrier that causes the siding to retain more heat than it would if it were against a standard wood substrate.
In high-heat environments, this trapped energy can push the PVC toward its heat distortion temperature faster. High-quality siding manufacturers often specify the types of underlayment that are compatible with their products. Always ensure that the insulation is installed flat and that the fasteners used for the insulation do not create bumps that will telegraph through to the vinyl surface.
Moreover, consider the “perm rating” of your underlayment. If the material is not breathable, it can trap vapor coming from the inside of the house, leading to moisture accumulation in the wall cavity. This moisture can distort the sheathing, which in turn distorts the siding. A comprehensive approach to fixing warped vinyl siding always looks at the wall as a complete system rather than just a cosmetic layer.
Color Matching and Material Sourcing Challenges
One of the biggest hurdles in fixing warped vinyl siding is achieving a visual match between the old and new panels. Vinyl siding fades over time due to UV exposure. Even if you have the original manufacturer and color code, a brand-new panel will likely look darker and more vibrant than the weathered panels currently on your home. This creates a “patchwork” effect that can hurt curb appeal.
To mitigate this, some professionals suggest a technique called “harvesting.” This involves removing a good, weathered panel from a less visible area of the house—such as the back of a garage or a low-visibility side wall—and using it to replace the warped panel on the front of the house. The new, brightly colored panel is then installed in the hidden area where the color mismatch is less noticeable.
If harvesting is not an option, you may need to look into specialized vinyl siding paints. While older vinyl was not meant to be painted, modern acrylic formulations are designed to bond with PVC. However, you must use a “vinyl-safe” paint color. Standard dark paints can absorb too much heat and cause the newly painted siding to warp all over again. Vinyl-safe palettes are specifically engineered to reflect infrared light.
Comparison: Repair vs. Full Vinyl Siding Replacement
| Factor | Localized Repair | Full Replacement |
|---|---|---|
| Cost | Low ($200 – $600) | High ($10,000 – $25,000+) |
| Timeframe | 1 – 4 Hours | 3 – 7 Days |
| Color Match | Difficult; likely visible | Perfect; uniform look |
| Longevity | Depends on remaining siding age | 25 – 50 Years |
| Energy Efficiency | No change | Opportunity to add insulation |
| Structural Health | Only addresses local area | Full inspection of the home’s exterior envelope |
Determining When Replacement is the Only Option
While fixing warped vinyl siding is often a viable short-term solution, there are clear indicators that a full vinyl siding replacement is necessary. If the warping is widespread across multiple elevations of the home, it suggests a systemic installation failure. Re-nailing every panel on a house is often more labor-intensive and costly than simply stripping the walls and starting over with fresh materials.
Age is another critical factor. Vinyl siding has a lifespan of approximately 20 to 30 years. If your siding is approaching the two-decade mark, the plasticizers that keep the PVC flexible have likely leached out, making the panels brittle. Brittle siding cannot be easily manipulated or “zipped” off the wall without shattering. In this case, attempting a repair is often an exercise in futility.
Furthermore, if the warping is accompanied by significant fading, cracking, or “chalking” (a white powdery residue on the surface), the material has reached the end of its aesthetic life. A full replacement allows you to upgrade to modern, “heavy-gauge” vinyl. These premium panels are thicker—often 0.044 to 0.048 inches—and are much more resistant to the oil canning and warping issues that plague thinner, builder-grade materials.
The Advantages of Modern Premium Vinyl
If you opt for a full replacement, you can take advantage of technological advancements in the industry. Modern premium vinyl often features reinforced nail hems, sometimes doubled over to provide extra wind resistance and stability. These “rolled-over” hems help the siding maintain a straight line across the wall, even if the underlying substrate has minor imperfections.
Additionally, many modern products come with “cool roof” technology applied to the siding surface. These are specialized pigments that reflect a higher percentage of infrared radiation. This technology drastically lowers the surface temperature of the panels, virtually eliminating the risk of thermal warping even in darker colors. This is a game-changer for homeowners who want a modern aesthetic without the maintenance headaches of older PVC formulations.
Finally, full replacement provides an opportunity to install an integrated “contoured foam” backing. This is foam insulation that is molded to the exact shape of the siding profile. Not only does this provide a massive boost to the home’s R-value, but it also acts as a shock absorber. It provides structural rigidity to the panel, making it feel more like wood and making it nearly impossible for the panel to warp or buckle inward.
Preventative Maintenance for Vinyl Siding Longevity
Preventing future issues is just as important as fixing warped vinyl siding after the fact. One of the simplest preventative measures is keeping the siding clean. Dirt and organic growth can trap heat and moisture against the panels. A gentle wash with a solution of white vinegar and water (or a dedicated siding cleaner) can maintain the reflective properties of the finish and keep the material cool.
Landscaping also plays a surprising role in siding health. Ensure that shrubs and trees are trimmed at least one to two feet away from the house. Foliage that rubs against the siding can scuff the finish, while dense brush can trap humidity and create a localized microclimate that promotes moisture-related warping. Adequate airflow is essential for the temperature regulation of the wall system.
Furthermore, be mindful of any changes to your home or your neighbor’s home that might affect solar reflection. If a neighbor installs new windows, keep an eye on your siding for several weeks to see if any “hot spots” appear. If you detect a concentrated reflection, you may need to install a screen over the exterior of their window or consider planting a strategically placed tree to break up the light path before it hits your siding.
The Importance of Professional Inspections
Many homeowners ignore minor ripples until they become major deformities. An annual walk-around inspection can help you catch these issues early. Look for panels that seem to be “popping” out of their tracks or areas where the shadow lines are no longer straight. If you catch a pinned panel before it permanently warps, you can simply loosen the nails and reset the piece, saving the cost of a replacement panel.
During these inspections, pay close attention to the “overlap” joints. Vinyl siding panels should overlap by about an inch. If you notice the joints are pulling apart, it means the siding was cut too short or the house is shifting. This creates an entry point for water and pests. Conversely, if the overlaps are tight and pressing against each other, the material will eventually warp when it tries to expand.
Engaging a professional siding contractor for a formal inspection every few years is a wise investment. They have specialized tools, such as infrared cameras, that can detect moisture behind the siding that hasn’t yet manifested as a visible warp. This proactive approach ensures that your home’s exterior remains both beautiful and functional for decades to come.
Conclusion: Restoring the Integrity of Your Exterior
Fixing warped vinyl siding is a multifaceted challenge that requires a deep understanding of material science, installation geometry, and environmental impact. Whether the cause is a nail driven too deep, a neighbor’s high-efficiency window, or the simple passage of time, the solution begins with an accurate diagnosis. For many, a localized repair using a zip tool and careful re-nailing will suffice to restore the home’s appearance.
However, we must also recognize the limitations of PVC. When the structural integrity of the panels is compromised by extreme heat or aging, the most cost-effective and long-term solution is a full vinyl siding replacement. Modern materials offer durability and thermal resistance that far exceed the products of previous decades, providing peace of mind and enhanced home value.
Ultimately, your home’s siding is its first line of defense against the elements. By maintaining this barrier and addressing distortions as soon as they appear, you protect the underlying structure from the devastating effects of water and rot. Stay vigilant, understand the signs of distress, and do not hesitate to consult with experts when the waves in your siding begin to signal deeper issues.