Dealing with Loose Siding Boards: The Complete Repair & Prevention Guide
The sound of a rhythmic tapping against your exterior walls during a brisk autumn breeze is often the first warning sign that your home’s protective envelope is compromised. Homeowners often find themselves overwhelmed when first dealing with loose siding boards, especially as they consider the potential for underlying structural damage. Maintaining the integrity of your vinyl siding is not merely an aesthetic concern; it is a critical component of moisture management and thermal regulation. When a panel becomes unclipped or begins to sag, it creates an entry point for driving rain, nesting insects, and invasive humidity that can rot your wall sheathing.

The exterior of your residence acts as a shield, but that shield is designed as a sophisticated system of interlocking parts rather than a static wall. Vinyl siding, specifically, is engineered to move, expanding and contracting with the dramatic shifts in seasonal temperatures. However, when this movement exceeds the design tolerances, or when the locking mechanisms fail, the system begins to decouple. Addressing these gaps early can save thousands of dollars in long-term remediation costs.
Understanding the nuances of your home’s exterior cladding is the first step toward effective maintenance. Whether you are a DIY enthusiast or a homeowner looking to vet a professional contractor, knowing the “why” behind siding failure is just as important as the “how” of the repair. In this comprehensive guide, we will explore the engineering of vinyl panels, the environmental factors that lead to loosening, and the most effective strategies for restoration.
The Mechanics of Exterior Cladding Movement
To effectively manage your home’s exterior, one must first appreciate that vinyl siding is a “floating” system. Unlike traditional wood siding that is nailed firmly to the studs, vinyl is hung from slots to allow for lateral movement. This unique design accommodates the high thermal expansion coefficient of polyvinyl chloride (PVC). On a hot summer day, a standard 12-foot panel of siding can expand by as much as half an inch or more.
If the siding were nailed tightly, this expansion would cause the panels to buckle, warp, or “oil-can,” creating unsightly waves across the facade. Consequently, the looseness you might feel when touching a panel is often intentional. However, there is a fine line between “floating” and “failed.” When the panels no longer grip the piece below them, the system’s weather-tightness is fundamentally broken.
Furthermore, the locking hem—the curved edge at the top and bottom of each board—is what provides the structural rigidity of the wall. When wind pressure gets behind a loose panel, it can create a vacuum effect known as “wind uplift.” This force can progressively unzip an entire section of a wall if the initial loose board is not addressed promptly.
Understanding Thermal Expansion and Contraction
The science of thermal dynamics plays a massive role in the stability of your siding. In regions with extreme temperature swings, the constant cycle of expansion and contraction puts immense stress on the nailing hem and the interlocking joints. Over decades, this fatigue can cause the vinyl to become brittle, making it more prone to cracking or slipping out of its track.
In addition, the color of your siding impacts its thermal behavior. Darker colors absorb more solar radiation, leading to higher surface temperatures and more significant expansion. If the original installers did not account for this by leaving proper gaps at the J-channels and corners, the resulting pressure can pop the boards loose from their locks.
Identifying the Symptoms of Loose Siding
Early detection is the most effective way to prevent catastrophic water intrusion. One of the most common signs that you are dealing with loose siding boards is a localized rattling sound during high winds. While some noise is normal in extreme storms, a persistent “clapper” sound usually indicates that a locking hem has detached from the row below it.
Visual inspections from the ground can also reveal subtle failures. Look for “shadow lines” that seem uneven. If one panel appears to be hanging lower than its neighbors, it has likely slipped off its nails or unclipped from the starter strip. This sagging creates a horizontal gap where water can easily migrate behind the cladding.
Another red flag is the presence of warped or “wavy” sections. When siding is pinned too tightly, it can’t expand horizontally, so it bows outward. This bowing often forces the bottom lock to disengage. Once disengaged, the panel loses its tension and becomes a loose liability during the next wind event.
Auditory Cues and Visual Distortions
Don’t ignore your ears when walking around your property. A “clicking” sound when the sun hits the side of the house in the morning is typical (thermal expansion), but a “thumping” or “flapping” during a breeze is a call to action. These sounds often originate from the upper stories where wind speeds are higher and leverage is greater.
Visually, check the “laps”—the points where two panels overlap horizontally. If these laps are pulling apart or showing large gaps, the entire run of siding may be shifting. This shift can be caused by the house settling or by poor original installation where the panels were not properly “clicked” into place during the upward build.
Dealing with loose siding boards
When you are dealing with loose siding boards, the approach depends heavily on the height of the damage and the cause of the detachment. For lower-level boards, the fix is often a simple matter of re-engaging the lock using a specialized tool. However, if the board is loose because the nailing hem has ripped or the nails have pulled out of the sheathing, a more technical repair is required.
The most important tool in your arsenal for this task is the “siding zip tool.” This inexpensive, hooked device allows you to reach under the edge of a panel, hook onto the locking track, and pull it down over the mounting flange of the board below. Without this tool, attempting to snap the siding back together by hand is frustrating and can lead to cracked vinyl, especially in cold weather.
Moreover, safety should be the primary concern. If the loose boards are on a second or third story, the risk of falling while wrestling with a long, flexible panel is significant. In these cases, hiring a professional with the proper scaffolding or high-reach ladders is the most prudent course of action. They can ensure that the board is not only re-attached but also properly nailed into the studs to prevent a recurrence.
The Essential Tool Kit for Homeowners
If you choose to tackle minor repairs yourself, you should assemble a specific set of tools. Beyond the aforementioned zip tool, you will need a hammer, 1.5-inch or 2-inch galvanized roofing nails, and perhaps a small pry bar. Having these ready prevents the need to scramble while you are balanced on a ladder.
In addition, consider having a tube of high-quality color-matched silicone caulk. While caulk should never be used to “glue” siding boards together (as this prevents necessary movement), it can be useful for sealing small cracks or gaps around trim pieces that may have been disturbed when the siding became loose.
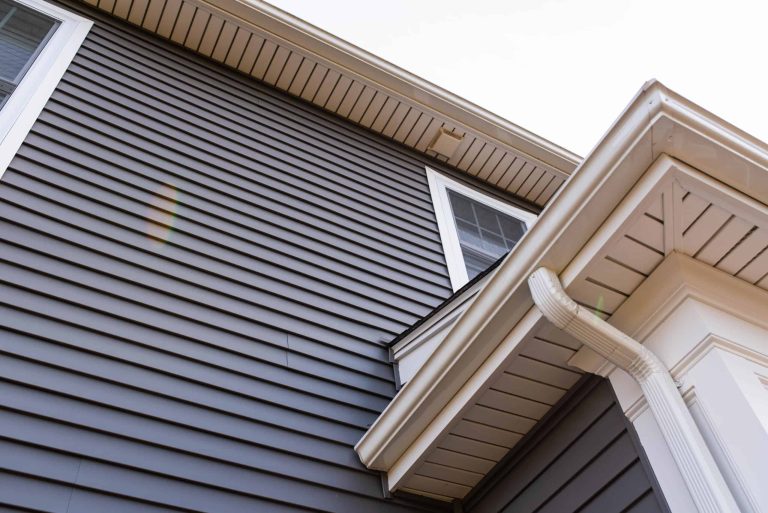
The Physics of Wind Uplift and Pressure
To understand why siding fails, one must look at the physics of air pressure. When wind blows against a building, it creates a high-pressure zone on the windward side and a low-pressure (suction) zone on the leeward side and corners. If air can get behind a siding panel, the pressure equalizes in a way that pushes the panel outward.
This is why most loose siding issues begin at the corners or near the roofline. These are high-turbulence areas where wind speeds are accelerated. If a corner post is loose or a J-channel is missing a nail, the wind finds a path. Once a single “pocket” of air is created behind the vinyl, it acts like a sail, pulling on the fasteners with hundreds of pounds of force.
Consequently, dealing with loose siding boards is often about managing air infiltration. Ensuring that the starter strip (the very first piece at the bottom of the wall) is securely fastened is vital. If the starter strip is loose, the entire wall is vulnerable to being “unzipped” from the bottom up by a strong gust of wind.
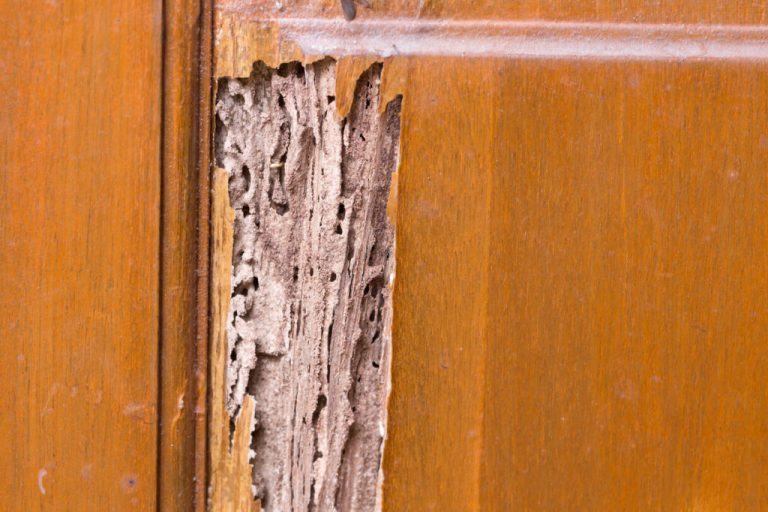
Sub-surface Risks: Moisture and Mildew
The most dangerous aspect of loose siding isn’t the cosmetic flaw; it’s the invisible damage occurring behind the scenes. When siding is loose, it allows “bulk water”—actual rain or melting snow—to bypass the primary shedding layer. While most homes have a water-resistive barrier (WRB) like Tyvek, these barriers are not designed to handle constant, direct water contact over long periods.
If water remains trapped between the loose siding and the house wrap, it can find its way to the OSB or plywood sheathing. This leads to wood rot, which compromises the structural integrity of your home. Furthermore, trapped moisture is a breeding ground for mold and mildew, which can eventually migrate into the wall cavities and affect indoor air quality.
In many cases, by the time a homeowner notices the siding is loose, the underlying sheathing has already begun to soften. This creates a “vicious cycle” where the nails holding the siding no longer have a firm substrate to grip, causing more boards to loosen. Timely intervention is the only way to break this cycle and preserve the home’s value.
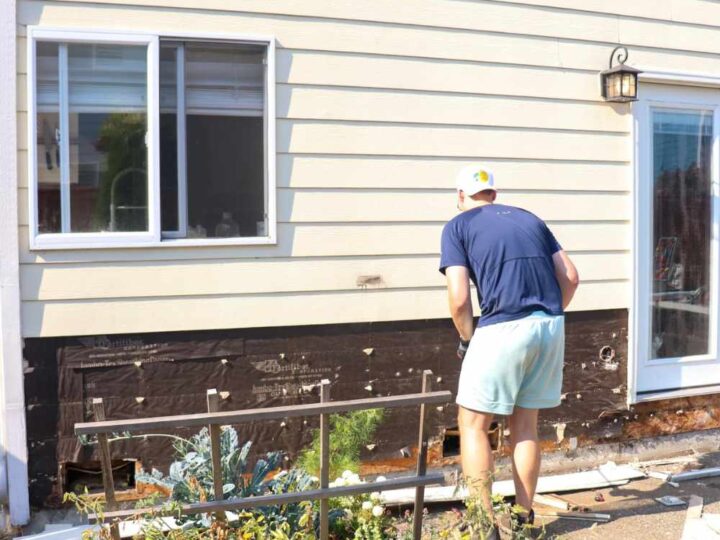
The Role of the Water-Resistive Barrier (WRB)
The WRB is your second line of defense. When dealing with loose siding boards, always take a moment to inspect the condition of the wrap behind the panel. If you see tears, holes, or signs of UV degradation, these must be repaired with specialized flashing tape before the siding is re-secured. A perfectly locked siding panel won’t help if the “skin” beneath it is full of holes.
Modern house wraps are engineered to be “breathable,” meaning they allow water vapor to escape from the inside while blocking liquid water from the outside. However, if the siding is loose and flapping, it can physically abrade the wrap, wearing it thin and destroying its effectiveness. Treat the wrap with as much care as the siding itself.
Installation Errors That Lead to Loose Panels
Often, the reason you are dealing with loose siding boards today is due to a mistake made years ago during the initial installation. The most common error is “hard-nailing.” As discussed, vinyl must be allowed to slide. If an installer drives the nails tight against the vinyl, the panel has nowhere to go when it expands. It will eventually warp or the nailing hem will shatter, causing the board to hang loose.
Another frequent issue is improper nail spacing. Industry standards typically require a nail every 16 inches, driven directly into the center of the wall studs. If an installer gets lazy and nails only into the sheathing, or skips studs, the siding lacks the necessary support to resist wind loads. Over time, the weight of the panels combined with wind vibration pulls these poorly placed nails out.
Furthermore, the “locking” of the panels is a physical click that should be felt and heard. If an installer fails to fully engage the lock before nailing the top hem, the panel is essentially “pre-loosened.” It might stay in place for a few months, but the first significant temperature change or windstorm will cause it to drop.
| Installation Error | Resulting Problem | Corrective Action |
|---|---|---|
| Hard-Nailing | Buckling and Hem Failure | Replace panel; nail with 1/32″ gap |
| Missing Studs | Panel Sagging/Falling | Locate studs and re-nail at 16″ intervals |
| Poor Locking | Horizontal Gaps/Rattling | Use zip tool to re-engage locks |
| Incorrect Overlap | Water Intrusion/Separation | Adjust panel positioning for 1″ overlap |
Nailing Techniques and Over-tightening Issues
The “Rule of Thumb” for siding installation is to leave about the thickness of a dime (1/32nd of an inch) between the nail head and the siding. This allows the panel to move. When homeowners or inexperienced contractors are dealing with loose siding boards, they often over-correct by hammering the nails in as far as they will go. This is a critical mistake that will cause the siding to fail again within a single season.
Additionally, the choice of nail matters. Always use aluminum or galvanized steel roofing nails. Common steel nails will rust quickly when exposed to the humidity trapped behind the siding. Rust not only weakens the fastener but also creates unsightly “bleeding” stains that can ruin the look of your light-colored siding.
Repairing Vinyl Siding: A Practical Methodology
If you have identified a single loose board, the repair process is straightforward but requires patience. First, clear any debris from the locking channel. Sometimes, dirt, wasp nests, or spider webs can accumulate in the groove, preventing a tight seal. Once clean, you will use your zip tool to start at one end of the loose section.
Insert the zip tool under the bottom edge of the loose panel and hook it onto the back lip. Pull down and out slightly to guide the lip over the locking edge of the panel below. Slide the tool along the length of the board, using your other hand to press the siding into place. You should feel the “click” as the panels marry together.
If the panel continues to slide down after being zipped, the problem is likely at the top hem. You will need to unzip the panel *above* the loose one to inspect the nails. If the nails have pulled out, or if the vinyl has ripped away from the nail, you may need to install a “siding repair hem” or replace the entire panel if the damage is extensive.
Resetting the Locking Mechanism
In some cases, the locking hem of the vinyl can become “relaxed” or stretched out. If zipping the panels together doesn’t provide a secure fit, you might need to slightly crimp the metal starter strip (if it’s a bottom board) or use a heat gun with extreme caution to very slightly reshape the vinyl lip. However, reshaping vinyl is risky and usually suggests that the material has reached the end of its functional lifespan.
Furthermore, ensure the panels are level. If you lock a panel while it is slightly tilted, it will create tension that eventually forces the lock to fail again. Use a 4-foot level to check the run of the siding before you finalize the attachment. Consistency across the wall is the key to a repair that lasts for years rather than weeks.
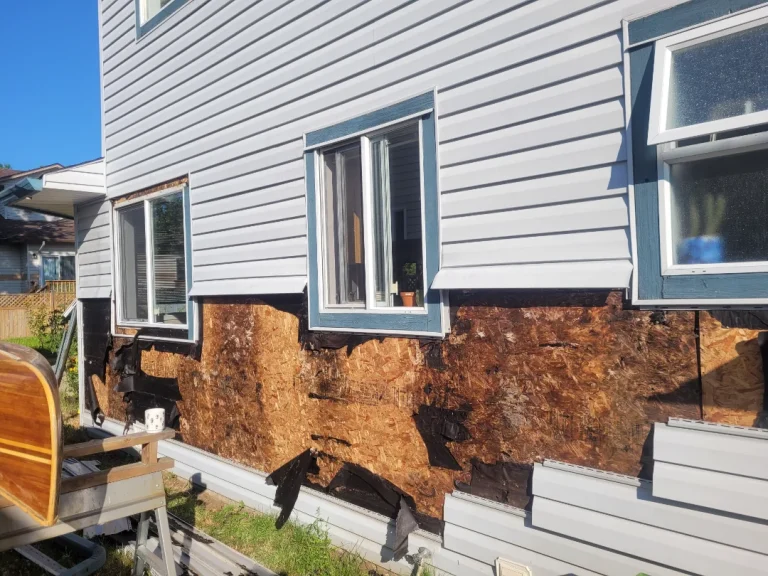
When Repair is No Longer a Viable Option
While dealing with loose siding boards through repair is cost-effective, there comes a point of diminishing returns. Vinyl siding typically has a lifespan of 20 to 40 years, depending on the quality and the environment. If your siding is brittle, fading significantly, or showing “chalking” (a powdery residue on the surface), it may be time for a full replacement.
Brittle siding is particularly difficult to repair. When you attempt to use a zip tool on aged, sun-damaged PVC, the material often cracks or shatters under the pressure. If you find that one repair leads to two more breaks, you are fighting a losing battle against material fatigue. At this stage, the “loose boards” are a symptom of a systemic failure of the cladding.
Moreover, if you discover widespread rot in the sheathing during your repairs, simply re-attaching the siding is like putting a bandage on a deep wound. The siding must be removed, the wood replaced, and a new moisture barrier installed. In such scenarios, a full vinyl siding replacement is the only way to guarantee the long-term safety of the structure.
Economic Analysis: Repair vs. Full Replacement
Homeowners must weigh the immediate cost of repairs against the long-term investment of a new installation. A professional repair for a few loose boards might cost a few hundred dollars. In contrast, a full siding replacement for an average-sized home can range from $10,000 to $25,000. However, the ROI (Return on Investment) for new siding is among the highest in the home improvement industry.
New siding improves energy efficiency by reducing air infiltration and, if combined with rigid foam insulation, significantly increasing the R-value of your walls. Additionally, modern vinyl products are far more durable and wind-resistant than those manufactured 20 years ago. When dealing with loose siding boards on an older home, consider how much you are spending annually on “patchwork” versus the peace of mind a warranty-backed new system provides.
Furthermore, consider the curb appeal. Loose, sagging, or mismatched siding (common after repairs where the new vinyl doesn’t perfectly match the faded old vinyl) can decrease your home’s market value. If you are planning to sell within the next five years, a fresh exterior is often a prerequisite for a top-dollar offer.
Selecting High-Quality Replacement Materials
If you decide to move forward with a replacement, don’t settle for the cheapest option. The thickness of the vinyl is a primary indicator of quality. Economy grade siding is typically 0.038 inches thick, while premium grades can be 0.048 inches or even 0.055 inches. Thicker panels are more rigid, resist sagging, and are far less likely to become loose over time.
Additionally, look for siding with an “enhanced locking system.” Many manufacturers have developed proprietary designs that feature a double-thick mounting hem or a “fold-over” design that provides extra strength against wind pull-out. These features are specifically designed to prevent the issues associated with dealing with loose siding boards in the future.
Finally, consider the wind rating. If you live in a coastal area or a region prone to high winds, ensure the siding is rated for 150 mph gusts or higher. This often involves specific installation requirements, such as using wider nail heads and specialized transition pieces, but it is a necessary investment for storm resilience.
Comparing Thickness and Grade
When reviewing quotes from contractors, always ask for the specific brand and line of siding they intend to use. A “thick” panel is not just about durability; it also hangs straighter. Thinner panels tend to follow the imperfections in your wall, highlighting every bump or dip in the studs. Thicker, “architectural” grade panels bridge these gaps, providing a much smoother, more professional appearance.
In addition to thickness, consider the “projection” of the profile. A deeper profile (the distance the siding sticks out from the wall) creates deeper shadow lines and a more traditional wood-look. It also adds structural rigidity to the board, making it less likely to flex and “unzip” from the locks during a storm.
Professional Intervention: Selecting a Contractor
When the scope of dealing with loose siding boards exceeds your comfort level, selecting the right professional is paramount. Look for contractors who are certified by the Vinyl Siding Institute (VSI). These professionals have undergone rigorous training on the proper “floating” installation techniques and understand the local building codes regarding moisture barriers and flashing.
Always check references and, specifically, ask about their experience with “re-siding” versus new construction. Re-siding an existing home is more complex because it involves dealing with the “unknowns” behind the old boards. A good contractor will include a “rot allowance” in their contract, specifying how much it will cost to replace damaged sheathing if they find it during the teardown.
Furthermore, ensure the contractor offers a labor warranty in addition to the manufacturer’s material warranty. Most manufacturer warranties only cover defects in the product itself, not the “loose boards” caused by improper nailing. A reputable firm should stand by their installation for at least 5 to 10 years.
Long-term Maintenance and Preventative Strategies
Once your siding is repaired or replaced, a proactive maintenance schedule will extend its life significantly. At least twice a year—ideally in the spring and fall—perform a “walk-around” inspection. Use a pair of binoculars to check the high peaks and difficult-to-reach areas for any signs of panels pulling away from the trim or J-channels.
Cleaning your siding is also essential. While dirt itself doesn’t make siding loose, the organic growth like mold or algae can trap moisture in the tracks, leading to premature degradation of the locking mechanism. Use a soft-bristle brush and a mild solution of water and vinegar or a dedicated siding cleaner. Avoid high-pressure power washers, as the force can drive water *behind* the panels and actually blow the boards loose from their tracks.
In addition, keep your landscaping in check. Trees or bushes that rub against the house can physically pull siding panels loose or scratch the surface coating. Maintain a 2-foot “clear zone” between your siding and any vegetation to ensure proper airflow and prevent mechanical damage.
Environmental Sustainability and Recyclability
As we become more conscious of our environmental footprint, it is worth noting that modern vinyl siding is more sustainable than many realize. PVC is a recyclable material, and many manufacturers now incorporate post-consumer content into their products. When dealing with loose siding boards that need to be replaced, ask your contractor if they participate in a siding recycling program to keep the old material out of landfills.
Furthermore, the long lifespan of premium vinyl means fewer resources are consumed over the life of the building compared to materials that require frequent painting or replacement. By maintaining your siding and repairing loose boards promptly, you are contributing to the longevity of the structure and reducing waste.
Ultimately, your home’s exterior is a complex harmony of materials, physics, and craftsmanship. Whether you are zipping a single board back into place or overseeing a complete overhaul, the goal remains the same: a secure, dry, and beautiful home. By understanding the mechanics of your siding, you empower yourself to make the best decisions for your property’s future.