Vinyl Siding Mold Removal Tips: The Ultimate Homeowner’s Guide
Maintaining the pristine appearance of a home often requires more than a simple rinse with a garden hose. Over time, external surfaces encounter a variety of environmental stressors that can lead to unsightly discoloration and structural concerns. Vinyl siding, while durable and popular for its low-maintenance profile, is particularly susceptible to organic growth due to its texture and the way it is installed on the building envelope. Understanding the nuances of “Vinyl siding mold removal tips” is essential for any homeowner looking to preserve their property’s value and curb appeal.

Mold and mildew thrive in damp, shaded environments, making the north-facing walls of a house or areas blocked by dense landscaping primary targets. These organisms are not merely aesthetic nuisances; they represent a biological colonization that can eventually compromise the integrity of the siding’s finish. Furthermore, if left unaddressed, spores can find their way into the substrate or the home’s interior, leading to much more significant remediation costs later on. Therefore, a proactive and informed approach to cleaning is the best defense against long-term damage.
The process of cleaning vinyl requires a delicate balance between effective chemical action and physical agitation. While many homeowners are tempted to reach for the highest-pressure setting on a power washer, this can often lead to unintended consequences such as water intrusion behind the panels. Instead, a systematic approach involving the right cleaning solutions and safety protocols ensures the siding remains intact while the mold is eradicated. In this comprehensive guide, we will explore the professional-grade strategies used to restore vinyl siding to its original luster.
Why Vinyl Siding is Susceptible to Bio-Growth
Vinyl siding is manufactured from polyvinyl chloride (PVC), a plastic resin that is inherently resistant to rot and insect damage. However, the surface of vinyl is not perfectly smooth; it often features a simulated wood grain texture that provides microscopic nooks and crannies. These recesses are ideal for trapping dust, pollen, and organic debris, which serve as the primary food source for mold and mildew spores. When combined with moisture from rain, humidity, or dew, these areas become breeding grounds for biological growth.
Furthermore, the physical installation of vinyl siding contributes to its vulnerability. Siding panels are designed to hang loosely on the wall to allow for thermal expansion and contraction. This creates gaps and “laps” where moisture can linger far longer than it would on a flat, non-porous surface. In regions with high humidity or frequent rainfall, the lack of rapid evaporation on shaded walls creates a persistent microclimate that favors fungal colonization.
In addition to environmental factors, the proximity of vegetation plays a significant role in mold development. Trees and shrubs that grow close to the house not only provide the shade necessary for mold to thrive but also drop organic matter directly onto the siding. This proximity also restricts airflow, preventing the siding from drying out after a storm. Consequently, the combination of organic food sources, consistent moisture, and restricted airflow makes vinyl siding a frequent host for various types of mold and algae.
Identifying the Culprits: Mold, Mildew, and Algae
Before implementing any cleaning strategy, it is important to identify exactly what is growing on your home. Mold typically appears as black, gray, or dark green spots that look like tiny specks of dirt. However, unlike dirt, mold will spread and grow over time, often forming dense clusters that are difficult to wipe away with water alone. Mold is a fungus that penetrates surfaces and can be particularly stubborn if it has had years to establish itself.
Mildew is a specific type of mold that tends to grow in a flatter pattern and is often white or gray. It is frequently found in areas with high humidity and poor ventilation. While mildew is generally easier to remove than deep-seated mold, it can still cause discoloration and an unpleasant musty odor. Both mold and mildew require a biocide or a strong oxidizing agent to ensure that the spores are completely neutralized during the cleaning process.
Algae, on the other hand, is often mistaken for mold but is actually a photosynthetic organism. It typically appears as a bright green or brownish streak, often following the path of water runoff. While algae does not “feed” on the siding in the way mold might, its presence indicates a moisture problem that will eventually lead to mold growth. Identifying these differences helps in selecting the appropriate chemical cleaner, as some solutions are better suited for fungi while others target chlorophyll-based organisms.
| Growth Type | Appearance | Common Causes | Difficulty of Removal |
|---|---|---|---|
| Mold | Black, dark green, fuzzy spots | Organic debris + high moisture | High (requires biocide) |
| Mildew | White or gray powdery film | Humidity + stagnant air | Moderate |
| Algae | Green or brown vertical streaks | Sunlight + consistent water runoff | Low to Moderate |
| Artillery Fungus | Tiny, hard black specks | Decaying wood mulch nearby | Very High |
Essential Supplies for Successful Cleaning
To execute professional-grade cleaning, you must gather the correct tools before starting. The most critical component is a long-handled scrub brush with soft bristles. Using a stiff-bristled brush or a wire brush is a common mistake that can permanently scratch the vinyl’s finish, leading to “oxidation” where the siding looks chalky and dull. A telescoping pole allows you to reach the second story without constantly moving a ladder, which increases both efficiency and safety.
In addition to brushes, you will need several five-gallon buckets for mixing solutions and rinsing your tools. A garden hose equipped with a high-quality spray nozzle is usually sufficient for the majority of residential siding projects. For those who choose to use a pressure washer, ensuring you have a low-pressure “soap tip” (usually the black nozzle) and a wide-angle “rinse tip” (the white or green nozzle) is vital to prevent damaging the siding or forcing water behind the panels.
Safety equipment should never be overlooked when working with chemical cleaners. Heavy-duty rubber gloves, safety goggles, and old clothing are essential. If you are cleaning high areas, a sturdy extension ladder and a secondary spotter are highly recommended. Finally, have a dedicated garden sprayer or “pump sprayer” on hand; this allows you to apply your cleaning solution evenly across the surface, giving the chemicals time to dwell and break down the organic bonds before you begin scrubbing.
Vinyl siding mold removal tips
When approaching the task of cleaning, one of the most effective “Vinyl siding mold removal tips” is to always work from the bottom up and rinse from the top down. This may seem counterintuitive, but applying the cleaning solution from the bottom ensures that you don’t leave “streak marks” caused by dirty water running down dry siding. By saturating the lower levels first, you create a lubricated path for the debris from the upper levels to slide off during the final rinse.
Another crucial tip is to avoid cleaning in direct sunlight. If the siding is hot, the cleaning solution will evaporate almost instantly, leaving behind a concentrated chemical residue that can be difficult to remove. This residue can cause permanent spotting or “flashing” on the vinyl. Ideally, you should choose an overcast day or work on the shaded side of the house as the sun moves. This allows the cleaning agent to remain “wet” on the surface, which is necessary for the chemical reaction to occur.
Furthermore, never underestimate the power of “dwell time.” Many homeowners make the mistake of scrubbing immediately after spraying the solution. In reality, most mold-killing agents require five to ten minutes of contact time to effectively dissolve the spores and the sticky biofilm that holds them to the siding. However, you must be careful not to let the solution dry completely. If the siding begins to dry, lightly mist it with water to keep the chemicals active until you are ready to scrub and rinse.
The Power of White Vinegar: A Natural Solution
For homeowners who are concerned about the environmental impact of harsh chemicals, white vinegar offers a potent and natural alternative. Vinegar is an acetic acid that is remarkably effective at killing approximately 80% of mold species. To create a vinegar-based cleaner, mix 30% white distilled vinegar with 70% water in a large bucket. This solution is particularly useful for light to moderate mold growth and is safe for use around most ornamental plants and pets.
In addition to its mold-killing properties, vinegar acts as a mild degreaser, helping to remove the layer of dust and atmospheric pollutants that often coat vinyl siding. When using vinegar, you may need to apply a bit more physical effort with your scrub brush compared to using bleach. However, the trade-off is a safer work environment and no risk of bleaching your clothes or harming the delicate balance of your garden soil. It is an excellent choice for regular maintenance cycles.
Oxygen Bleach vs. Chlorine Bleach
When faced with heavy, stubborn mold, homeowners often turn to bleach. However, it is important to distinguish between chlorine bleach and oxygen bleach. Chlorine bleach (sodium hypochlorite) is incredibly fast-acting and will turn black mold white almost instantly. While effective, it is highly caustic and can damage the protective UV coating on vinyl siding if used in too high a concentration. It is also toxic to plants and can cause soil pH imbalances if not heavily diluted and rinsed properly.
Oxygen bleach (sodium percarbonate) is a much gentler alternative that is frequently used by professional restoration experts. When mixed with water, it releases concentrated oxygen that breaks the molecular bonds of the mold. It is non-toxic, biodegradable, and safe for vegetation. The only downside is that it works more slowly than chlorine bleach, often requiring a longer dwell time and more vigorous scrubbing. However, for the longevity of your vinyl siding and the health of your landscaping, oxygen bleach is often the superior choice.
Preparing Your Home for the Cleaning Process
Before the first drop of cleaner touches the siding, you must prepare the surrounding area to prevent collateral damage. Begin by closing all windows and doors tightly. Check for any gaps in window seals or door sweeps where water could potentially enter the home. If you have outdoor electrical outlets or light fixtures, cover them with plastic wrap and secure them with painter’s tape. While these fixtures are designed to be weather-resistant, they are not always built to withstand a direct spray from a hose or pressure washer.
The next step involves protecting your landscaping. Even “eco-friendly” cleaners can cause stress to delicate flowers and shrubs if they are applied in concentrated amounts. Thoroughly saturate the soil and the leaves of any nearby plants with plain water before you begin. This creates a “water shield,” preventing the plants from absorbing the cleaning solution. For particularly sensitive or expensive plantings, consider covering them with a lightweight plastic tarp or drop cloth for the duration of the cleaning process.
Finally, clear the work area of any tripping hazards. Move patio furniture, grills, and children’s toys away from the perimeter of the house. Ensure that your garden hose is long enough to reach all sides of the building without being overextended. If you are working on a multi-story home, walk the perimeter to identify any overhead power lines or obstacles that could interfere with your telescoping brush or ladder placement. Proper preparation reduces the risk of accidents and allows you to focus entirely on the cleaning task at hand.
Step-by-Step Manual Scrubbing Technique
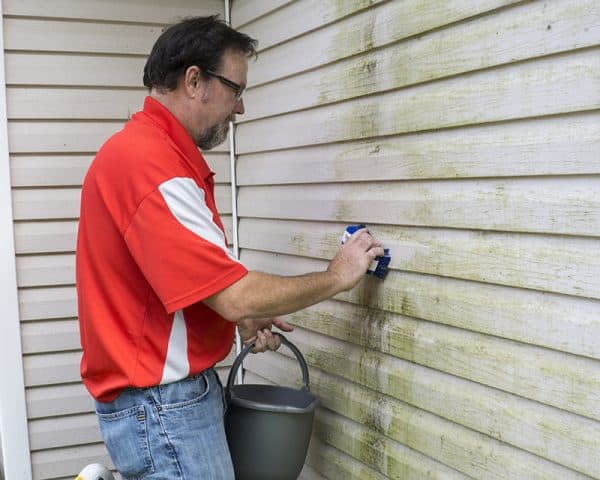
Manual scrubbing is often the safest and most effective way to clean vinyl siding without risking damage to the home’s infrastructure. Start by mixing your chosen solution in a five-gallon bucket. Using a pump sprayer, apply the solution to a manageable section of the wall—roughly 10 feet wide. Remember to start from the bottom and work your way up to prevent streaking. Allow the solution to dwell for several minutes, keeping a close eye to ensure it does not dry out.
Once the solution has had time to work, take your soft-bristled brush and begin scrubbing. Use circular motions to ensure the bristles reach into the grain of the vinyl. Focus on the “laps” where one panel overlaps another, as this is where mold spores tend to hide. You do not need to apply extreme pressure; the chemical cleaner should have done the heavy lifting, and the brush is simply there to dislodge the loosened debris. If you encounter a particularly stubborn spot, apply more solution and wait a few more minutes rather than scrubbing harder.
After scrubbing the section, rinse it thoroughly with a garden hose. Start the rinse from the top of the wall and work your way down, ensuring that all soapy residue and loosened mold are washed away. Pay special attention to the J-channels around windows and the soffits, as soap suds can get trapped in these areas. Once the section is clean, move to the next area, overlapping slightly with the previously cleaned section to ensure no spots are missed. This methodical approach guarantees a uniform finish across the entire side of the house.
The Pros and Cons of Pressure Washing
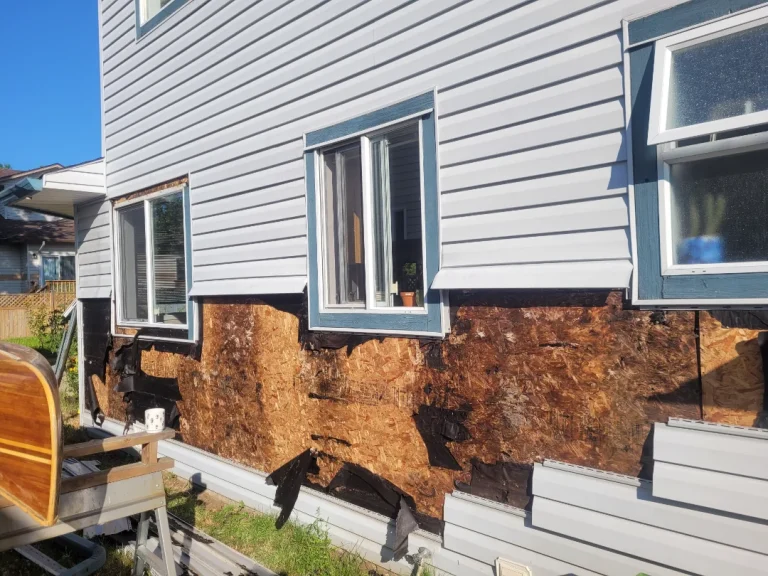
Pressure washing is a tempting option because it promises to complete the job in a fraction of the time. When used correctly, a pressure washer can blast away years of grime and mold with minimal physical effort. However, the risks associated with pressure washing vinyl siding are significant. The most common issue is “water intrusion.” If the wand is aimed upward or at a sharp angle, water can be forced behind the siding panels, soaking the house wrap and potentially leading to rot or interior mold growth that you cannot see.
Another risk is physical damage to the siding itself. High-pressure streams can crack aged, brittle vinyl or “blow out” the weep holes designed for drainage. Furthermore, many homeowners unknowingly strip the factory finish off the vinyl, leaving it vulnerable to rapid UV degradation. If you do choose to use a pressure washer, it is vital to keep the pressure below 1,500 PSI and use a wide-angle nozzle. The goal should be to use the machine as a delivery system for the soap and a high-volume rinse, rather than a high-pressure “scraper.”
| Method | Advantages | Disadvantages | Recommended For |
|---|---|---|---|
| Manual Scrubbing | Safest for siding, prevents water intrusion, very thorough. | Labor intensive, takes significant time. | Fragile siding, heavy mold, DIY homeowners. |
| Pressure Washing | Fast, reaches high areas easily, minimal scrubbing. | Risk of cracking siding or causing leaks. | Large homes, experienced operators, light cleaning. |
| Soft Washing | Uses chemicals to do the work, low pressure. | Requires specific chemical knowledge. | Professional-grade results, delicate surfaces. |
Mastering the Soft Wash Technique
Soft washing is the industry standard used by professionals to clean delicate surfaces like vinyl siding and roofs. This technique relies on a higher concentration of cleaning surfactants and biocides applied at very low pressure (similar to a strong garden hose). The “soft wash” philosophy is that the chemistry should do 95% of the work. By allowing the specialized cleaning agents to penetrate the mold colonies and kill them at the root, the need for high pressure is eliminated entirely.
To perform a soft wash, you typically use a specialized applicator or a “downstream injector” on a pressure washer that pulls the chemical from a bucket and mixes it with the water stream at a low-pressure setting. This allows you to coat the entire side of a house in minutes. After the dwell time, a high-volume, low-pressure rinse washes everything away. This method is incredibly effective for large-scale mold removal and is the safest way to handle two-story homes without spending hours on a ladder.
Addressing Stubborn Stains and Deep Spores
Sometimes, even after a thorough cleaning, you may notice persistent gray or black shadows on the siding. These are often “ghost stains” where the mold has actually etched into the surface or where a biofilm remains. To combat this, you may need a specialized mold and mildew stain remover that contains “surfactants”—soap-like molecules that reduce the surface tension of water, allowing the cleaner to penetrate deeper into the pores of the vinyl.
Another common issue is artillery fungus, also known as “shotgun mold.” These appear as tiny, hard black dots that look like peppercorns. They are actually spore masses launched from decaying wood mulch in your garden beds. Standard mold cleaners will not touch these; they are encased in a sticky, resinous substance. Removing artillery fungus often requires individual attention, using a plastic putty knife to gently scrape the dot away, followed by a localized cleaning with a citrus-based solvent or a specialized adhesive remover.
Cleaning High and Hard-to-Reach Areas
Reaching the peaks and gables of a home is the most challenging part of any siding project. For many, a telescoping pole is the first line of defense. High-quality poles can extend up to 20 feet or more, allowing you to scrub the second story while keeping your feet firmly on the ground. When using a pole, it is important to choose a brush head that has bristles on the sides as well as the front, which helps clean the undersides of the siding laps as you move the pole up and down.
If a pole isn’t sufficient, you will need to use a ladder. Safety is paramount here: always use a ladder stabilizer or “stand-off” to prevent the ladder from resting directly against the vinyl siding, which can crush or crack the panels. Never overreach while on a ladder; a good rule of thumb is to keep your belt buckle between the ladder rails. If you cannot reach a spot safely, it is far better to hire a professional with a lift or specialized equipment than to risk a fall.
Seasonal Maintenance Cycles
Consistency is the secret to a mold-free home. Ideally, you should perform a visual inspection of your siding every spring and autumn. Spring is a critical time because the winter months often provide the damp, dark conditions mold loves. An early spring cleaning removes the spores before the heat of summer bakes them onto the surface. Conversely, a quick fall rinse removes the pollen and organic dust that would otherwise serve as a food source for mold during the dormant winter season.
In addition to regular cleaning, keep an eye on your home’s “micro-climates.” If you notice that one particular corner of the house is always damp or turns green faster than the rest, you may need to clean that specific area more frequently. Simple maintenance, such as rinsing the siding with a garden hose once a month during the humid summer, can prevent mold from ever taking hold. By incorporating “Vinyl siding mold removal tips” into your semi-annual home maintenance routine, you ensure that the task never becomes a massive, multi-day ordeal.
The Role of Landscaping in Mold Prevention
Your garden and yard have a direct impact on the health of your vinyl siding. Dense shrubbery that touches the house creates a bridge for insects and moisture, while also providing the shade mold needs to flourish. To prevent this, maintain a “dead zone” of at least 12 to 24 inches between your siding and any vegetation. This gap allows for proper airflow, which helps the siding dry quickly after a rainstorm and discourages mold growth.
Furthermore, consider the type of mulch you use in your flower beds. As mentioned earlier, wood-based mulches are the primary source of artillery fungus. If you have persistent issues with black specks on your siding, switching to a stone mulch or a high-quality rubber mulch can eliminate the problem at the source. Additionally, ensure that your trees are trimmed so that branches do not overhang the roof or brush against the siding, as these can drop debris and drip water onto the walls long after the rain has stopped.
How Gutters Influence Siding Health
Clogged or leaking gutters are one of the leading causes of localized mold growth on vinyl siding. When gutters overflow, water sheets down the side of the house, keeping the siding perpetually wet and depositing organic debris from the roof. This constant moisture is an invitation for mold and algae. If you notice vertical green streaks starting from the roofline and moving down, your gutters are likely failing to direct water away from the building envelope.
Ensure your gutters are cleaned at least twice a year and check for leaks in the seams. Downspouts should also be positioned to carry water at least three to five feet away from the foundation. By managing roof runoff effectively, you remove the primary ingredient for mold growth: water. A dry house is a clean house, and maintaining your drainage system is just as important as the cleaning process itself when it comes to long-term siding preservation.
Evaluating the Integrity of Your Siding
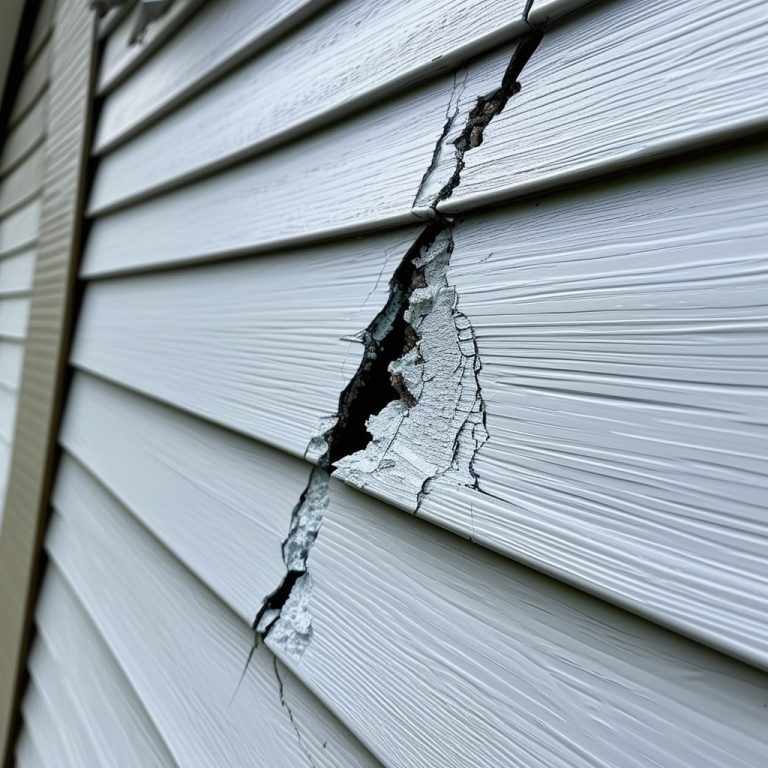
During the cleaning process, you have a unique opportunity to inspect the physical condition of your siding. Look for signs of “chalking,” which is a powdery residue that comes off on your finger. This is a sign that the vinyl is aging and its protective finish is breaking down. While cleaning can remove the chalk, it also indicates that the siding is becoming more porous and will likely attract mold more quickly in the future. This may be a sign that it is time to consider vinyl siding replacement.
Also, check for warped or “buckled” panels. Vinyl needs to move; if it was nailed too tightly during installation, it might warp, creating large gaps where water and pests can enter. If you find sections where the mold seems to be coming from *behind* the siding, this is a major red flag. It suggests that the moisture barrier or house wrap has failed, and you may have structural rot occurring underneath. In these cases, cleaning is only a temporary cosmetic fix for a much deeper architectural problem.
When to Call the Professionals
While DIY cleaning is feasible for many, there are situations where hiring a professional is the wiser choice. If your home is more than two stories tall, the safety risks of ladder work often outweigh the cost of a professional service. Professional cleaners have access to industrial-grade biocides and specialized equipment, such as low-pressure pumps and high-reach lances, that can clean a house more thoroughly and safely than a homeowner with a bucket and brush.
Additionally, if you are dealing with extreme infestations of mold or the dreaded artillery fungus, a professional will have the experience to remove these without damaging the siding. They also carry insurance, which protects you in the event of accidental damage to the home or an injury on your property. When hiring, always ask about their “soft wash” capabilities and ensure they use plant-safe chemicals to protect your landscape. A professional cleaning usually costs between $300 and $600 for an average home, which is a small price to pay for the safety and the guaranteed results.
Environmental Considerations for Runoff
It is easy to forget that everything you wash off your house eventually ends up in the soil or the local storm drain system. Chlorine bleach and high-phosphate detergents can be harmful to aquatic life if they enter waterways in high concentrations. When cleaning, try to use the minimum amount of chemical necessary to get the job done. If you are using bleach, make sure it is heavily diluted (usually a 1:10 ratio with water) and always keep the surrounding soil saturated with fresh water to dilute any runoff.
Consider using “green” cleaners that are labeled as biodegradable and phosphate-free. Many modern siding cleaners use hydrogen peroxide or citric acid as their active ingredients, which break down into harmless byproducts like water and oxygen. By being mindful of your runoff, you protect your local ecosystem and ensure that your home maintenance doesn’t come at the cost of environmental health. Proper disposal of any leftover concentrated cleaning solutions is also vital; never pour them down a storm drain.
Final Inspection and Post-Cleaning Protection
Once the siding is dry, do a final walk-around. Look at the house from different angles to ensure no streaks or “holidays” (missed spots) remain. This is also the time to check that you haven’t accidentally displaced any panels or caused any cracks during the scrubbing process. If you find any small holes, such as those left by old shutter screws or cable lines, seal them with a high-quality exterior caulk to prevent future water intrusion.
To keep the mold from returning, some homeowners apply a “siding protectant” or a specialized wax. While not strictly necessary, these products can create a hydrophobic surface that causes water and dirt to bead up and roll off. However, the most effective “post-cleaning protection” is simply maintaining the preventative measures discussed earlier: keeping gutters clear, trimming back bushes, and performing regular rinses. With these “Vinyl siding mold removal tips” and a dedicated maintenance schedule, your vinyl siding can look brand new for decades.