Repairing Cracked Vinyl Siding Panels: The Ultimate Homeowner’s Guide
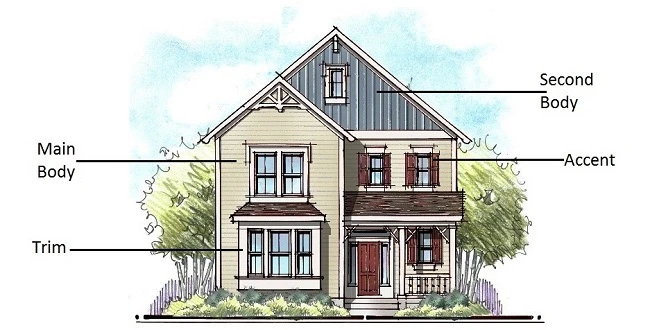
Maintaining the exterior of a modern home requires a keen eye for detail and a proactive approach to structural preservation. Vinyl siding is a popular choice for homeowners due to its durability and low maintenance, yet it remains susceptible to physical damage over time. Whether caused by a stray pebble from a lawnmower, extreme temperature fluctuations, or accidental impact, cracks can compromise both the aesthetic and the protective function of your home’s envelope. Understanding the nuances of repairing cracked vinyl siding panels is essential for preventing water infiltration and ensuring the longevity of your property’s substrate.
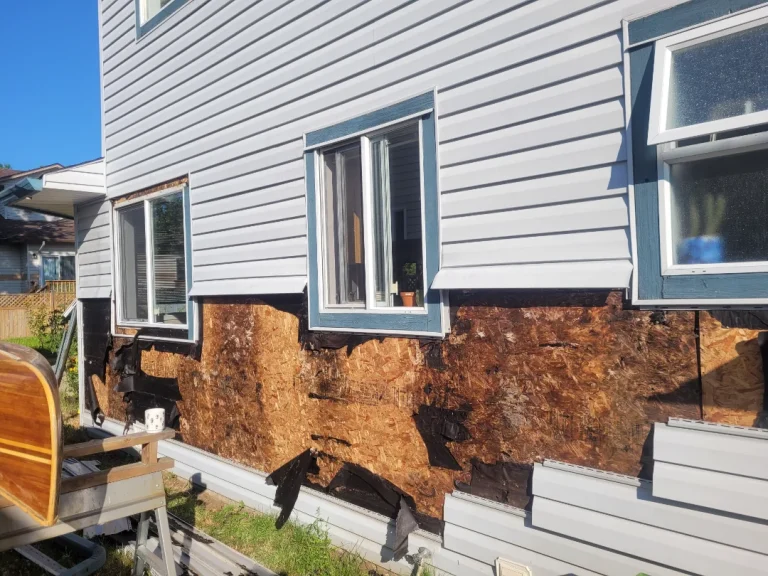
The integrity of your home’s exterior serves as the first line of defense against the elements. When a panel fails, it creates a pathway for moisture to penetrate the underlying sheathing, leading to potential rot or mold. Consequently, repairing cracked vinyl siding panels should be viewed as a critical maintenance task rather than a purely cosmetic fix. By addressing these issues early, you can avoid the significant expenses associated with full-scale siding replacement and structural remediation. This guide provides an exhaustive analysis of the techniques required to restore your siding to its original condition.
Vinyl is a resilient material, but it is not invincible. As it ages, the plasticizers that provide flexibility begin to dissipate, especially under the constant bombardment of ultraviolet radiation. This process makes the panels increasingly brittle, rendering them prone to fracturing upon the slightest impact. Furthermore, the expansion and contraction cycles of seasonal weather can exacerbate existing stress points. Identifying these vulnerabilities is the first step in creating a long-term strategy for home exterior management and successful repair outcomes.
Identifying the Root Causes of Vinyl Degradation
To effectively manage your home’s exterior, you must first understand why vinyl siding fails. Most cracks originate from a combination of environmental stressors and mechanical impacts. In colder climates, vinyl becomes exceptionally rigid, making it vulnerable to cracking if struck by even small objects. Conversely, in extreme heat, the material expands significantly, and if it was installed too tightly, the resulting pressure can cause buckling or stress fractures near the nail hem.
Ultraviolet (UV) exposure is perhaps the most persistent enemy of polyvinyl chloride (PVC). Over decades, the sun’s rays break down the molecular bonds of the plastic, leading to a “chalking” effect and a loss of elasticity. Once the material loses its ability to flex, it can no longer withstand the natural shifting of the house or the pressure of high winds. This degradation often manifests as hairline cracks that gradually widen into significant gaps if left untreated.
Installation errors also play a substantial role in premature siding failure. Vinyl siding is designed to “float” on the wall, allowing it to move horizontally as temperatures change. If a contractor nails the panels too tightly against the sheathing, the material is restricted. This lack of movement leads to internal stress, which eventually finds release through cracking or warping. Recognizing these patterns helps homeowners decide whether a simple patch is sufficient or if a more comprehensive repair strategy is necessary.
Assessing the Severity of the Damage
Before initiating any repair work, a thorough assessment of the damage is mandatory. Not all cracks are created equal; some are merely surface-level blemishes, while others penetrate the entire thickness of the panel. A hairline crack may only require a specialized sealant, whereas a large impact hole necessitates a patch or a full panel replacement. Examining the area behind the crack is also vital to ensure that no moisture has already begun to affect the house wrap or the wooden sheathing.
During your inspection, look for signs of “weeping” or staining around the crack, which indicates that water has been trapped behind the vinyl. If the area feels soft or spongy when pressed, the damage may have already reached the structural components of the wall. In such cases, repairing cracked vinyl siding panels is only the first step, as the underlying rot must also be addressed. Proper diagnosis ensures that your efforts are not just a temporary bandage on a deeper problem.
Essential Tools for the Homeowner’s Toolkit
Successful siding repair is highly dependent on having the correct instruments at your disposal. While some homeowners attempt to use standard household tools, specialized siding tools are designed to work with the unique interlocking mechanisms of vinyl panels. The most critical tool is the “zip tool,” also known as a siding removal tool. This simple metal device allows you to unhook the bottom edge of a panel from the one below it without damaging the delicate vinyl locking tabs.
In addition to the zip tool, you will need a high-quality utility knife with a sharp supply of blades. Precision is key when cutting patches or trimming damaged sections. A hammer and galvanized roofing nails are also necessary for securing new panels or re-securing loose ones. Ensure the nails have a wide head and are long enough to penetrate at least 3/4 of an inch into the wall studs or sheathing. Using the wrong nails can lead to rust streaks or panels that pull away during heavy storms.
Materials for the repair itself include exterior-grade silicone caulk that is color-matched to your siding, or a donor piece of matching vinyl for larger patches. If your siding is older, finding an exact color match can be difficult due to fading. In these instances, many professionals recommend taking a sample to a specialized paint store for a custom-mixed exterior paint. This allows you to blend the repair seamlessly into the surrounding area, maintaining the home’s visual continuity.
| Tool Name | Primary Function | Importance Level |
|---|---|---|
| Siding Zip Tool | Unlocking and re-locking siding panels without damage. | Critical |
| Utility Knife | Cutting and trimming vinyl patches to size. | High |
| Galvanized Nails | Securing panels while preventing rust and corrosion. | High |
| Color-Matched Sealant | Filling hairline cracks and waterproofing small gaps. | Essential |
| Snips / Shears | Cutting through the thick nail hem of donor panels. | Medium |
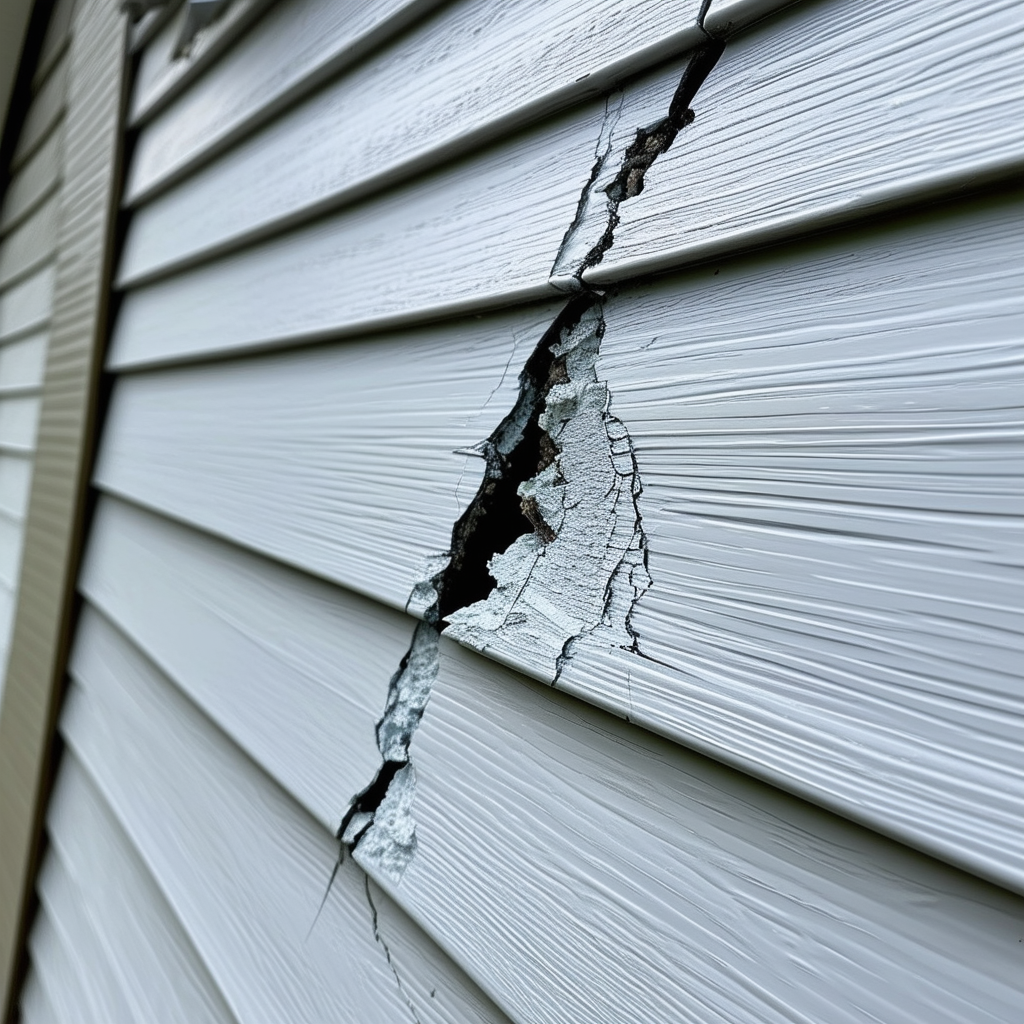
Repairing cracked vinyl siding panels
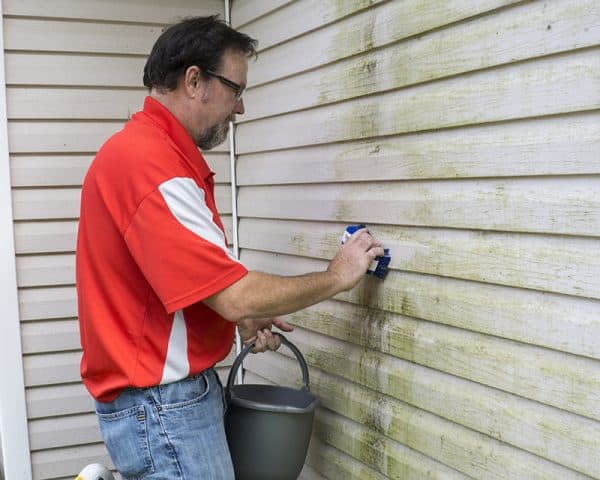
When you are faced with the task of repairing cracked vinyl siding panels, the first step is to clean the area thoroughly. Dirt, algae, and oxidation can prevent adhesives and sealants from bonding correctly to the surface. Use a mixture of mild detergent and water, along with a soft-bristled brush, to scrub the damaged panel and the surrounding area. Allow the vinyl to dry completely before applying any repair materials, as moisture can trap air bubbles and weaken the bond of the sealant.
For small, hairline fractures, the application of a high-quality, flexible exterior sealant is often the most effective route. Carefully apply the sealant along the length of the crack, ensuring it penetrates the opening. Use a putty knife or a gloved finger to smooth the bead, making it as flush as possible with the surface of the siding. Because vinyl expands and contracts, the sealant must remain pliable after curing; otherwise, the natural movement of the house will cause the repair to pop out or fail within a few months.
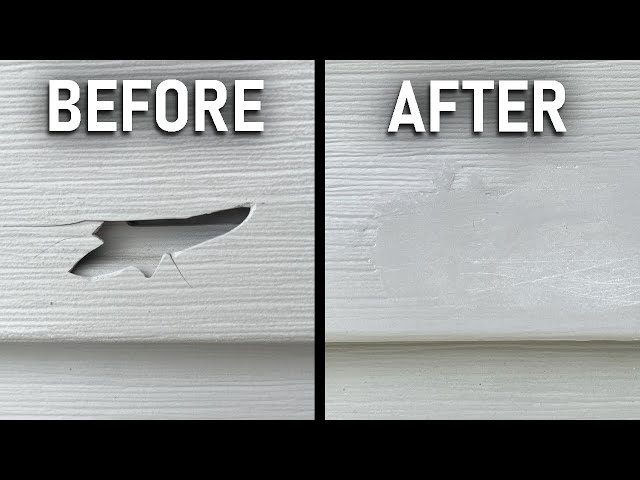
In cases where the damage is more extensive, such as a hole or a long jagged split, a patch method is required. This involves cutting a “donor” piece from a matching siding panel that is slightly larger than the damaged area. After cleaning both the damaged panel and the patch, apply a thin layer of siding-specific adhesive or sealant to the back of the patch and press it firmly over the crack. This creates a secondary layer of protection that restores the panel’s ability to shed water effectively while reinforcing the structural integrity of the damaged section.
The final consideration in repairing cracked vinyl siding panels is the visual finish. If the patch or sealant is visible, you may need to apply a thin coat of matching paint. Always choose a paint that is formulated for use on PVC, as standard oil-based paints can cause the vinyl to warp by absorbing too much heat. By taking these extra steps, you ensure that the repair is not only functionally sound but also aesthetically pleasing, preserving the value and curb appeal of your home.
Managing the “Zip Tool”: A Strategic Guide
The zip tool is the secret weapon of professional siding contractors. It features a small hook at the end of a metal handle, designed to slide under the “butt” or bottom edge of a vinyl panel. Once inserted, you pull down and out to release the locking mechanism that holds the panel to the one below it. Mastery of this tool is essential because it allows you to access the nail hem of the damaged panel without having to tear apart the entire wall.
Using the tool requires a gentle touch. If you pull too forcefully, especially in cold weather, you risk snapping the locking tab, which would necessitate a much larger repair. Instead, slide the tool along the length of the panel, unhooking it inch by inch. This methodical approach ensures that the integrity of the surrounding panels remains intact. Once the damaged panel is unhooked, you can easily remove the nails from the hem and slide the panel out for replacement or more intensive patching.
The Science of Color Matching and Fading
One of the most challenging aspects of vinyl siding repair is addressing the inevitable fading caused by sun exposure. Even if you have leftover panels from the original installation, they will likely be several shades darker than the siding currently on your house. This discrepancy can make even a perfect physical repair stand out like a sore thumb. To mitigate this, some homeowners choose to “harvest” a panel from a less visible area of the home, such as the back of a garage or behind a chimney, to use for repairs on the front facade.
If harvesting is not an option, color-matching technology has improved significantly. Many home improvement centers offer spectrophotometer readings, which can analyze a small chip of your siding and create a custom paint color. When painting a repaired section, it is often best to paint the entire panel rather than just the patch. This helps the repair blend in with the natural shadows and highlights of the siding profile, making the fix virtually invisible to the naked eye.
Furthermore, consider the light reflectance value (LRV) of the paint you select. Painting vinyl a color that is significantly darker than the original can lead to excessive heat absorption. This heat can cause the vinyl to reach its “heat distortion temperature,” leading to permanent warping or melting. Always stay within a few shades of the original color to ensure the material remains stable throughout the summer months. This scientific approach to color management is vital for a professional-grade result.
Patching Techniques for Punctures and Holes
Punctures from hail or rocks require a different approach than simple cracks. Because a puncture involves missing material, a sealant alone is rarely sufficient. You must create a physical bridge over the hole. Start by trimming away any jagged or protruding edges of the hole with a utility knife to create a clean, flat surface. This ensures the patch sits flush against the panel and prevents water from pooling in the recesses of the damage.
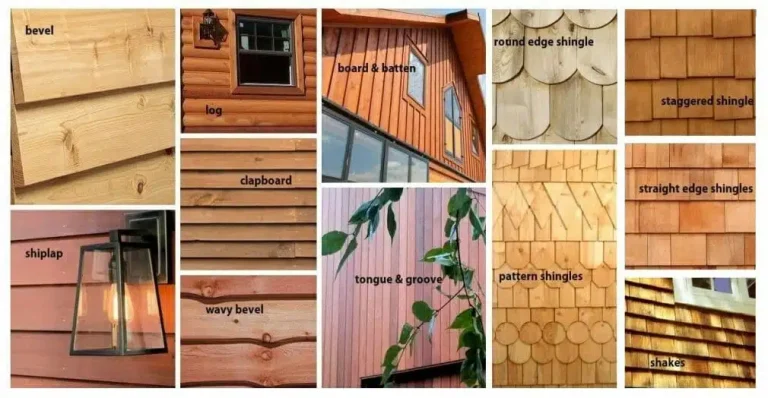
When cutting your patch from donor material, try to match the grain or texture of the original siding. Vinyl siding often has a simulated wood grain, and aligning the “grain” of the patch with the grain of the panel makes a huge difference in visibility. Apply the adhesive only to the edges of the patch to allow the center to flex slightly with the wall. This technique mimics the natural behavior of the siding and prevents the patch from cracking under thermal stress.
Structural Implications of Unresolved Siding Cracks
While a crack might seem like a minor cosmetic issue, the structural implications of ignoring it can be severe. Vinyl siding is designed as a rain screen; its primary job is to shed the bulk of water away from the house. It is not, however, a waterproof barrier. Below the siding sits the house wrap and the sheathing. When cracks appear, they allow “wind-driven rain” to bypass the siding and saturate the materials behind it. Over time, this moisture can lead to the degradation of the wooden frame of the home.
In addition to rot, moisture behind siding creates an ideal environment for mold and mildew growth. These fungi can eventually penetrate the interior walls, affecting indoor air quality and necessitating expensive professional remediation. Furthermore, damp insulation loses its R-value, leading to increased energy costs as your HVAC system struggles to maintain temperatures. Repairing the exterior skin is, therefore, a fundamental part of maintaining the thermal envelope and structural health of your residence.
Another often-overlooked consequence is pest infestation. Insects such as termites, carpenter ants, and even wasps are drawn to the moisture and the sheltered gaps created by damaged siding. A crack provides a convenient entry point into the wall cavity. Once inside, these pests can cause significant damage to the wood or create nests that are difficult to remove. By sealing cracks promptly, you eliminate these “highways” for unwanted guests, protecting your home from the inside out.
Sealants and Adhesives: Selecting the Right Chemistry
Not all caulks are suitable for vinyl siding. Many common household caulks, such as those intended for interior trim or bathrooms, will fail quickly when exposed to the outdoor environment. For vinyl, you must use a high-performance, 100% silicone sealant or a thermoplastic elastomer. These materials are specifically engineered to bond with non-porous surfaces like PVC and maintain their elasticity across a wide range of temperatures. They are also highly resistant to UV degradation, ensuring the repair doesn’t become brittle and crack again.
In addition to silicone, some professionals use specialized PVC solvents for certain types of repairs. These solvents actually “weld” the vinyl pieces together by temporarily melting the surface of the plastic. This creates a chemical bond that is often stronger than the surrounding material. However, this method requires extreme precision and is generally only recommended for experienced DIYers or professionals, as any spill can permanently disfigure the siding panels.
When applying adhesives, always consider the “open time” of the product. In hot weather, some adhesives can skin over in seconds, preventing a proper bond. Conversely, in cold weather, they may take days to cure. Always check the manufacturer’s recommendations for application temperatures. Proper chemical selection and application are the backbone of a repair that lasts for years rather than weeks, providing peace of mind and long-term protection for the structure.
Temperature Fluctuations and Thermal Expansion
Vinyl is one of the most thermally active building materials used today. A 12-foot panel of vinyl siding can expand or contract by as much as 1/2 to 3/4 of an inch between the heat of summer and the cold of winter. This constant movement is why the repair process must be flexible. If you use a rigid epoxy to fill a crack, the next time the temperature drops, the siding will contract and the epoxy will likely pull away, often taking a piece of the original vinyl with it.
To account for this movement, repairs should ideally be performed during moderate temperatures (between 50°F and 75°F). This is when the siding is in its “neutral” state. If you must repair in the dead of winter, be aware that the vinyl will be brittle and prone to shattering. In the height of summer, the material will be fully expanded, and any patches applied may buckle when the weather cools. Understanding this cycle is paramount to ensuring the longevity of your repair work.
Step-by-Step Replacement of Entire Panels
Sometimes, repairing cracked vinyl siding panels via patching is not enough, particularly if the damage spans multiple areas of a single board. In these cases, full panel replacement is the most logical choice. Start by using your zip tool to unhook the panel directly above the damaged one. This will reveal the nail hem of the panel you need to remove. Use a pry bar or the claw of your hammer to carefully remove the nails, being cautious not to damage the house wrap behind them.
Once the nails are out, the damaged panel should slide down and out easily. Before installing the new panel, check the exposed wall for any signs of water damage. If everything looks clear, take your new panel and slide it into place, hooking the bottom edge onto the panel below. Push it up until the nail hem is positioned correctly. This “locking” sensation is vital; if the panel isn’t fully seated in the lock, it can rattle in the wind or even blow off during a storm.
When nailing the new panel, remember the “floating” rule. Place your nails in the center of the pre-punched slots and leave a small gap (about the thickness of a dime) between the nail head and the siding. This allows the panel to slide back and forth as it expands and contracts. If you nail it tight, the panel will almost certainly crack or warp within the first year. Finally, use the zip tool to pull the upper panel back down over the new one, locking it firmly in place.
Preventive Maintenance and Cleaning Schedules
The best way to handle siding damage is to prevent it through regular maintenance. A bi-annual inspection of your home’s exterior can help you spot minor issues before they become major headaches. Look for loose panels, small chips, or areas where the siding has unhooked from the locks. Cleaning your siding once a year with a garden hose and a soft brush also prevents the buildup of mold and mildew, which can trap moisture against the surface and accelerate the degradation of the plastic.
Avoid using high-pressure power washers on vinyl siding. The intense pressure can force water behind the panels, soaking the insulation and sheathing. Furthermore, the force can easily shatter older, brittle panels, creating the very cracks you are trying to avoid. A simple “wet-scrub-rinse” method is much safer and just as effective for removing dirt and oxidation. Regular cleaning also keeps the siding looking new, which can significantly enhance your home’s resale value.
Cost-Benefit Analysis: DIY vs. Hiring a Contractor
For many homeowners, the decision to repair siding themselves comes down to cost. A DIY repair for a few cracks or a single panel typically costs less than $50 in materials and tools. In contrast, hiring a professional siding contractor for a small repair can cost anywhere from $200 to $500, as most companies have a minimum service fee to cover their travel and overhead. If the damage is localized and easily accessible, the DIY route is highly economical.
However, there are scenarios where a professional is the better choice. If the damage is high up on a second or third story, the safety risks of working on a ladder may outweigh the cost savings. Additionally, if the cracking is widespread across the entire house, it may indicate a systemic installation failure or that the siding has reached the end of its lifespan. A professional can provide a comprehensive assessment and determine if a full replacement is a more cost-effective long-term solution than endless small repairs.
Another factor is the quality of the finish. Professionals often have access to a wider variety of siding profiles and colors that may no longer be available at local retail stores. They also have the experience to blend repairs seamlessly. If your home has a complex siding profile or a unique color, the expertise of a seasoned contractor can ensure that the repair doesn’t negatively impact the home’s aesthetic. Weigh the complexity of the job against your own comfort level and tool availability before starting.
| Factor | DIY Approach | Professional Contractor |
|---|---|---|
| Material Cost | $20 – $100 | $50 – $150 (included in labor) |
| Labor Cost | Free (Your time) | $150 – $400+ |
| Expertise | Varies by individual | High / Specialized |
| Safety Risk | Moderate to High | Low (Insured professionals) |
| Warranty | None | Typically 1 year on labor |
Environmental Impacts on Material Longevity
Geography plays a significant role in the frequency of siding repairs. Homes in coastal areas are subjected to salt spray, which can leave a corrosive film on the siding and affect the metal fasteners. In the Midwest or North, hail is a frequent culprit for shattered panels. Even the direction your house faces matters; the southern-facing side of a home usually experiences the most UV damage and thermal cycling, leading to faster embrittlement of the vinyl.
Understanding your local environment allows you to tailor your maintenance strategy. For example, if you live in a high-wind area, ensuring that every panel is correctly locked and that the nail hem is securely fastened is a top priority. In wooded areas, you may need to clean the siding more frequently to prevent tannins from trees from staining the panels. By adapting your care routine to your specific climate, you can extend the life of your siding and reduce the frequency of repairing cracked vinyl siding panels.
Troubleshooting Common Repair Failures
Even with the best intentions, siding repairs can sometimes fail. One of the most common reasons is poor surface preparation. If the vinyl wasn’t cleaned properly, the sealant or adhesive will eventually peel away, exposing the crack once again. Always use a de-greasing cleaner and ensure the area is bone-dry. Another failure point is the use of incompatible materials. Some caulks contain chemicals that can actually soften and deform the vinyl over time, making the damage worse.
If you find that a patch is “bubbling” or pulling away at the corners, it is likely due to thermal expansion. If the patch was applied in extreme heat, it might pull tight as it cools, breaking the bond. Alternatively, if the patch was too thick, it may catch the wind and be pried off. To fix this, remove the failed patch, clean the area again, and use a thinner piece of donor vinyl with a more generous application of flexible, high-grade sealant around the perimeter.
Integrating Repairs with Full Home Inspections
When you are out repairing cracked vinyl siding panels, take the opportunity to inspect the other exterior components of your home. Check the caulking around windows and doors, as these are common failure points for the moisture barrier. Inspect the soffits and fascia for signs of animal intrusion or rot. Often, a crack in the siding is just one symptom of a home that needs a little extra attention. A holistic approach to maintenance ensures that your home remains a safe, dry, and efficient environment for your family.
Furthermore, check the “J-channel” trim around the windows and the “starter strip” at the very bottom of the wall. These components are essential for channeling water away from the structure. If they are bent or cracked, they can lead to water pooling in areas where it shouldn’t. Integrating these small checks into your siding repair routine can prevent major structural issues down the line, saving you thousands of dollars in potential repairs and maintaining the overall integrity of the building.
The Role of House Wrap and Moisture Barriers
It is important to remember that vinyl siding is a “cladding” system, not a waterproof seal. The real work of keeping your home dry is done by the house wrap or weather-resistant barrier (WRB) located directly behind the panels. This fabric-like material is designed to stop liquid water from entering the house while allowing water vapor to escape. When you are performing repairs, take a moment to inspect the condition of this barrier through the crack or hole.
If the house wrap is torn or degraded, it must be repaired before you seal the siding. You can use specialized house wrap tape to seal small tears. If large sections are missing, you may need to tuck a new piece of wrap under the existing upper layer to create a “shingle” effect that sheds water properly. Neglecting the moisture barrier while repairing cracked vinyl siding panels is a common mistake that can lead to internal wall damage despite a perfectly patched exterior. Always ensure the secondary defense is as strong as the primary one.
Safety Protocols During High-Elevation Repairs
Safety should never be compromised for the sake of a quick repair. When working on elevated sections of siding, ensure your ladder is on stable, level ground. Use a ladder stabilizer if possible to prevent the top of the ladder from crushing the siding or slipping against the wall. If the repair requires both hands, use a tool belt to keep your zip tool, knife, and sealant within reach, preventing the need for dangerous over-reaching while on the rungs.
Additionally, be mindful of power lines. Many homes have electrical service entries located near the roofline or siding. Keep metal ladders and tools at least ten feet away from these lines at all times. If the damage is located near electrical wires, it is often best to call a professional who has the training and equipment to work safely in those areas. No home repair is worth the risk of a serious fall or electrical accident.
Future-Proofing Your Home’s Exterior
As you conclude your repairs, consider how you can future-proof your siding. If your house is prone to impact damage from landscaping, consider creating a “no-mow” zone or a gravel border around the perimeter to keep lawnmowers and weed-whackers at a safe distance. If your siding is nearing the end of its 20-30 year lifespan, start planning for a full replacement. Modern vinyl siding is significantly more durable, UV-resistant, and comes in a wider array of styles than the materials used decades ago.
Ultimately, the key to successful home maintenance is persistence. By mastering the art of repairing cracked vinyl siding panels, you take control of your home’s longevity and appearance. Whether through minor sealant applications or full panel replacements, your dedication to maintaining the exterior skin of your home pays dividends in both comfort and financial value. Keep your tools ready, your eyes sharp, and your home will stand strong against the elements for many years to come.